Or a cornet or a flugelhorn. This guide applies to all of our horns. In this how to guide, you’ll learn about the different types of lubricants used on our horns, tips, and mistakes to avoid.
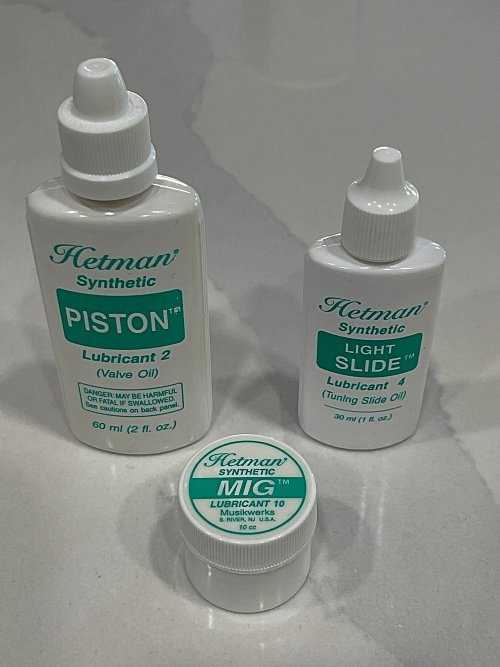
Table of Contents
Types of Oil to Use
Oil is oil right? You would think huh? Just like oil for your car, there are two main types of valve oils: synthetic and petroleum based. Just like the fancy stuff for your car, synthetic valve oils are made from man-made chemicals and are designed to provide long-lasting lubrication without attracting dirt and dust. Petroleum based ones are made from organic materials such as dead dinosaurs, oh wait. I mean they are usually made from smelly stuff like mineral oil. What’s the difference? Well, synthetics don’t smell and I found they last a bit longer. The reason for this is petroleum based oils are made from different sized molecules per Yamaha. The smaller ones evaporate faster and then you are left with larger ones that can then slow down your valves. Synthetic ones are made with similar sized molecules which evaporate at the same rate. The petroleum based ones are made from well, oil. Oil stinks. So it’s pretty easy to just use your nose to tell which type you are using.
For our horns, it’s important to use the same type of oil to prevent gumming things up. The different brands of valve oil make their product differently and keep their formulas secret near as I can tell. But the big thing to keep track of is if you are using synthetic oil, keep using synthetic. I was using a regular one (Al Cass) and during a performance, needed to oil one of my valves. So a bandmate handed me his bottle of valve oil that just happened to be synthetic and it worked. For awhile. About 2 weeks later, number one was really sluggish. Had to clean the horn to remove all the oil on the valves. If you want to switch types, do it after the next time you deep clean your trumpet. That way you’ll have removed all the oil that you had used before and you won’t have the problems I did.
In the same way, there are different types of slide lubes. Slide oil and slide grease. As their name implies, you use slide oil on slides that need to move easily like your first and third tuning slides. For the main tuning slide, that’s where grease works best. It lasts much longer than slide oil. I also put slide grease on the second tubing and the threads on the top and bottom valve caps. That way when I need to remove them for cleaning, they come apart easily.
Removing & Oiling Valves
To oil your trumpet valves, start by picking a valve oil. If you’ve used petroleum based ones in the past, keep using that type. I like to use a light, synthetic valve oil that can provide long lasting lubrication without the smell that made me wanna barf when I was younger.
To oil your valves, start by unscrewing the top cap and pull the piston out carefully. Wipe the piston with a microfiber cloth to remove the old oil and any dirt. I don’t always do that, but it’s a good thing to do. Apply a few drops of oil to the bottom part of the piston, ensuring a thin layer of valve oil covers the entire smooth surface. Gently slide the piston back into the casing and twist it slightly to ensure the oil is evenly distributed.
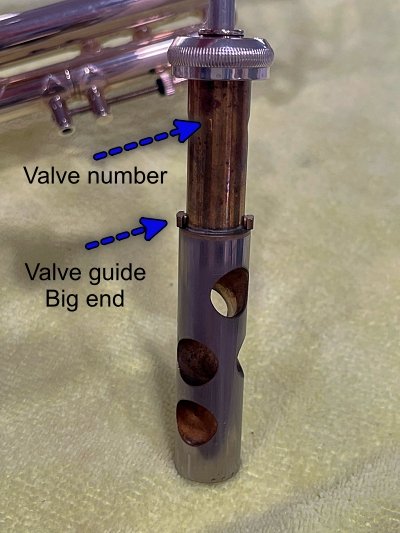
To remove the valves completely, start by looking for a number on the valves so you know which one goes back where. Unscrew the valve cap and carefully pull out each one. I like to always start with the first one which is closest to the mouthpiece. Look at the valve guide. It’s either nylon or brass and usually has a wide and a small end and sits under the spring. This means they only fit one way into the valve casing (see pic above). For my Yamaha flugelhorn for example, the wide part is on the side of the valve casing that is closest to the bell. So I remember “big end next to the big pipe” (bell). That works for my simple brain. Instead of trying to remember, just take a pic with your phone.
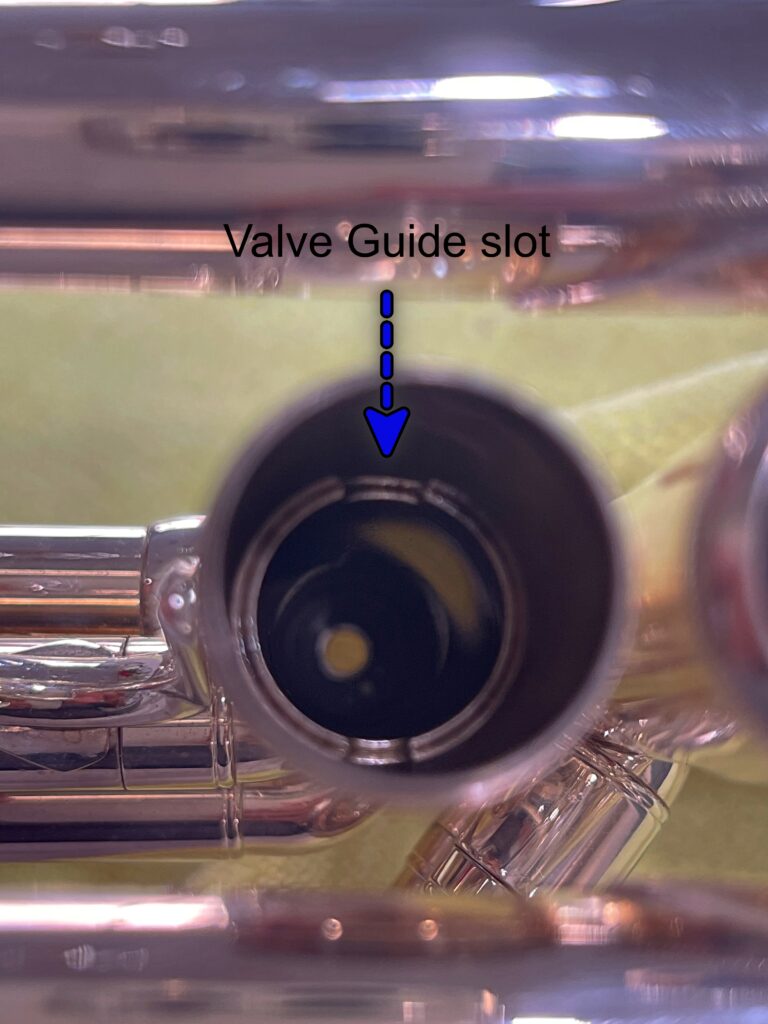
I don’t use paper towels as they can leave lint. I also like to put a little oil on the main part of the the piston and rotate it slightly to spread it around in the casing. The biggest key is to make sure the valves are properly aligned with the valve guide before screwing the valve caps back on. You can usually feel or hear a slight click when the guide seats in the slots in the casing. Don’t spin the them in the casing as that can cause scratches on it or the casing.
After you do all three, blow air into your horn. If you can’t blow freely through it, then one (or more) of the valves is installed incorrectly. Start with the first, make sure it’s aligned correctly and keep going until you find the one that is the problem.
How Often Should You Oil Trumpet Valves?
I do it when they need it. Things such as dirt and lack of lubrication can cause your valves to stick or go slower when you press them. If you force one down with not enough oil, you can cause it to scratch or even damage the finish on it and the inner walls of the cluster. Then you’ve got bigger problems because nothing will move as smoothly as before. Had a bandmate in the 7th grade do that on one of the schools trumpets. He jammed the second valve down so hard (hit it with his fist) the trumpet had to be sent away to be repaired. Our band teacher was not “pleased” shall we say. When the horn came back, it still worked, but it was much harder to play and had an odd click at times.
How often should you do this varies depending on how often you play. It’s generally recommended to oil the valves every 1-2 weeks for optimal performance. But I do it by feel. If my valves are moving well, I leave them. If I pull my horn out and they are a bit sluggish, I’ll oil them. That’s one thing I’ve noticed since switching to synthetic valve oil, they don’t seem to need oiling as often as when I used the stinky stuff.
Common Mistakes
The common mistakes that I’ve made and seen others do are:
- Oiling the valve stem. This is where you put oil on the stem that goes into the top valve cap thinking the oil will run down to the valves. Well, what’s in the way? Right, the felt washer. That felt is there to cushion the piston valve when you release it. The spring inside sends it back upward and the felt washer absorbs the impact when the top hits the underside of the valve cap. Oiling this way seems like it’ll be faster since you aren’t unscrewing the valve cap. But in reality, this just causes the felt to absorb the oil and then it won’t do its job as well. Some horns have rubber washers to do this job. Doesn’t matter, the oil isn’t going where you want it to be.
- Putting oil in the hole of the bottom cap. This doesn’t put the oil where it needs to go either.
- Putting the valves in the wrong position. This usually happens after washing a horn. Forgetting the correct valve alignment and which one goes into which hole. Thankfully most horns have a number on each piston. And you took a pic with your phone right?
- Spinning the valves in the cluster. Don’t do this. The reason is, this can grind off some metal and reduce the ability for everything to seal correctly.
Stuck Valves

This is not as common as you’d think. Usually this is found on horns that haven’t been used in a long time. Why does this occur? Well, the distance between the piston and the side of the valve casing on a good quality trumpet is between 0.0005 to about 0.001 inches. For reference, a human hair is about 0.001 inches in diameter. So a hair could jam things up if one got in there. Yes, things are that tight. On professional trumpets, the artisans that make them hand lap the valves. This means when they are making a new horn, they use a abrasive compound on them to remove tiny bits of metal from the valve and the casing. This makes them fit perfectly and ensure they seal well.
So what do you do if you have a stuck valve? Here’s a few tips.
1. First, use as little force as possible. The valves and their parts are not designed to handle any kind of pressure. So bashing it with your fist like my classmate did is definitely a no-no.
2. Remove the bottom valve cap, flip the horn upside down and drizzle valve oil down the sides of the cluster so it seeps between the piston and the walls of the casing. Do this by touching the applicator of the valve oil bottle on the sides of the valve casing. Don’t pour oil into the hole at the bottom of the piston. It will just fill it up and it won’t help to free it. Let this sit for several hours or overnight.
3. Try the same thing from the top if it isn’t stuck in the down position. Remove the top cap and drizzle oil down the sides of the cluster. Avoid getting any on the felt washer. I found lifting up the cap and washer if possible to the bottom of the button makes it easier to get the oil where you want it.
4. If the it’s stuck in the down position, gently unscrew the top valve cap. That is usually enough pressure to move the it so the oil can get in there.
5. Failing these, make a call to your favorite musical instrument repair shop. You don’t want to force it and risk damaging your horn.
Oiling Slides
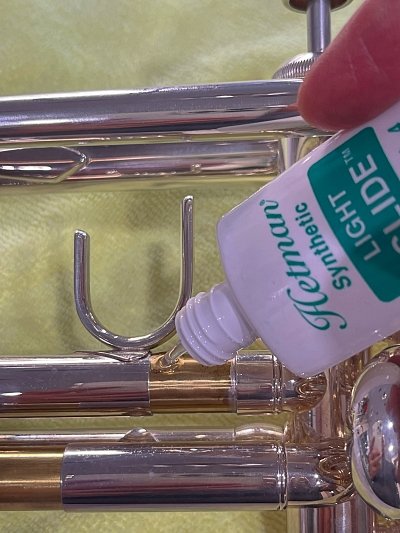
I use slide oil on my 1st valve slide and 3rd slides as they have triggers to move them for intonation. When I was young, I used a little petroleum jelly with a fewdrops of valve oil. That worked, but wasn’t ideal. Now I use synthetic slide oil on those slides. It lets them move easily and smoothly. The nice thing is these slides don’t need to be oiled very often.
Greasing Slides

A little goes a long way when it comes to greasing your slides. You only need a light coating on the end of the tubing that goes inside other tubes. As you insert the slide into your horn, the grease will spread as you go. I just use my finger, get a little on it and coat the end of the slide all the way around. Then I slip it in and wipe off any excess. I use grease on the main tuning slide and the 2nd slide. That little short one is the one that usually gets stuck in horns so when I give my horns a bath, I grease the second valve slide so I can remove it the next time. The other place I grease (as mentioned above) are the valve caps (just a little on the threads is all). It makes disassembly so much easier when things come off without having to use any force.
Stuck Slides
Oh boy, this is a tough one. Slides are notorious for getting stuck. The problem usually occurs when there is no lubrication or the lubrication dried up. Then it’s raw brass against raw brass gunked up by dried grease. Add a little moisture from our spit and the metal can oxidize or otherwise corrode. I’m no scientist but all that adds up to is a slide that won’t move.
How do you unstuck a stuck slide? Is that even a sentence? Anyway, people (us included) mistakenly would try to use force to free the slide. You hold the horn and I’ll pull on the main tuning slide to free it. Sounds like a good idea right? More often than not these antics would result in a damaged horn. Our horns are made from brass. But isn’t metal strong? Yes, most metals are. Brass however is not. It’s strong enough to hold together and play beautiful music. Our trumpets, cornets, and flugelhorns however were never built to withstand someone pulling as hard as they can trying to pull it apart. I’ve seen bells bent, lead pipe braces snapped, and even lead pipes cracked.
Okay, so no force. What do you do instead? Use a penetrating oil. There are ones that are specifically designed for use on brass instruments. You can try valve oil and let it soak as a first step. But if it’s been stuck for a while, that’s when something stronger like the right penetrating oil will help. Let it soak overnight and then try “gently” trying to remove the slide. If it doesn’t budge, time to visit your local instrument repair shop.